


Hey everyone,
Don't you just hate it when you try to apply perspective to full-body characters, and the anatomy seems off? Can't tell if it's the perspective or incorrect anatomy? No worries! I have three tips for you to try out today.
Last week, I discussed general anatomy and tips on building various body shapes more efficiently. This week, I want to focus on applying perspective to those shapes, especially when the character appears as if you're looking at them from a top-down view.
Top-Down View Perspective
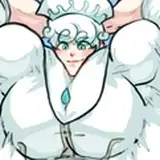
The challenge of this viewpoint is depicting taller characters accurately. Focus on creating long extremities (neck, arms, legs) and smaller heads, like with Kalduk, a character I designed for Afterorder. The key is maintaining the sense of proportion when playing with perspective. This depends on the viewer's position - if they're looking up at the character from below, the proportions should convey a sense of tallness.
Ctrl-T Perspective (or Command-T on Mac): First, create your character without applying perspective in a standard full-body view. Once finished, use Ctrl-T/Perspective to transform the anatomy. Select the layer, press Ctrl-T, right-click the selection, choose 'Perspective,' and move one of the top corners left or right. To achieve the effect, make the top wider and the bottom narrower. Be aware that this may shrink your character, so before pressing Enter, right-click the selection again, change to 'Scale,' and stretch the layer vertically from the top-center handle.
I typically create characters with perspective already applied and then use Ctrl-T to enhance the effect. It's crucial to do this at the beginning of your process, during the sketch phase, so you can refine details. If done after adding details, it might look like a flat image with perspective, which is not ideal.
Keep the Legs Long: To maintain a taller appearance when adding perspective, ensure the legs cover at least half of the canvas. To help with this, create a guide line in the middle of the canvas. In Photoshop, press Ctrl-R (Windows) or Command-R (Mac) to activate the rulers. Click on the top ruler and drag a guide to the middle of the canvas. You can hide this line later by pressing Ctrl-H (or Command-H).
Ctrl-T Warp (or Command-T on Mac): After applying perspective, use 'Warp' to adjust the anatomy for a more natural and relaxed pose. When using references or creating characters from memory, consider how the character would look while standing or resting—usually with most of their weight on one leg, creating an imaginary "S" shape in their body. Warp emphasizes this posture. As with perspective, do this during the shape stage, not after adding details. Access 'Warp' the same way as 'Perspective,' by selecting the layer, pressing Ctrl-T, right-clicking the selection, and choosing 'Warp.'
I'll be sharing references with this specific perspective on my personal Pinterest board, so give it a try. Remember, developing these skills requires practice and attention to imperfections, allowing your eye to become more discerning.
If you find these instructions difficult to follow, don't worry! In the process video for this painting, I'll include a brief demonstration of these tips. Keep an eye out for tomorrow's post for the Mastering Maestro tier.
Today I wanted to try another sea animal, the "shark". Di is a butcher who prefers cutting people over fish, but he can only do this if they look like cute little penguins.
Don't forget that our weekly challenge, "Orca," is still ongoing! You have a few days left to participate. I'm thinking about adding some exciting rewards for the participants... so stay tuned on Discord!
Thanks for your support!


