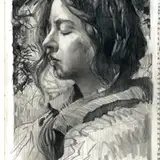
In my Sketchbook Saturday ongoing email series (free to join!) I transitioned into the new year over my break with some fun fan art of the Witcher main characters. I'm going to share some points I've learned about portraiture, demonstrated in these three pages from my book, and cover some tips I think are key in working with not only the figure, but the portrait.
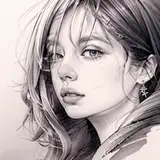
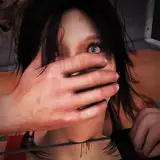
First, just a quick breakdown of the pages: the portrait studies on the LEFT of each page are of the actors playing Geralt, Yennefer, and Ciri, respectively, from the Netflix series "The Witcher". The portraits on the RIGHT of each page are my personal interpretation of the characters from the books of the Witcher series written by Andrzej Sapkowski. And yes, I am more of a nerd than you know.
Tips I find Essential to Portraits:
1. The body - including the face - almost always has asymmetry, if not on a macro scale, then certainly a micro one. There are no straight lines in the body; bones always have asymmetrical "s" and "c" curves and irregular facets throughout their structure (because of how we need to move and how the muscles attach), musculature and organs are organic, function-driven masses creating medial, lateral, anterior and posterior asymmetry, the nervous system threads through our bodies and is not the same from right to left, top to bottom, front to back, and the features and ways each one of us grow into our bodies are never perfectly balanced.
It's this inherent dynamism and imperfection that gives us our individuality. So as artists, whether we are capturing essence, expression, anatomical accuracy, or impression, we MUST notice asymmetry and how it serves the likeness of the figure.
I like to say, likeness comes through the individualization of structure. Meaning, to get at what makes someone look like themselves, as opposed to a contrived head, we've got to go beyond knowing how to measure out classical proportions, and get into how one eye is larger/deeper set/lower/wider than the other, how the bridge of the nose has a different contour between the left and the right, or how the alignment of the mandible to the ear/skull/zygomatic process is not the same on both sides.
So if you're drawing portraits and you find you're getting a little too lost down the rabbit hole of trying to make the two halves of the face exactly like each other, pull it back and embrace the truth of asymmetry; it's what makes us look real, and it will help you differentiate structures into characteristic features.
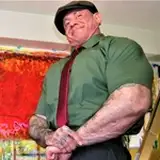
2. Knowing anatomy shows us where we are misunderstanding what we see. This improves with time, as we learn and practice, but it does help to understand, for example, that how you draw the shape of the jaw is not just determined by the jaw bone shape itself, but also the degree of developed muscle over the face, as well as the degree of fatty tissue on top of that. Again, every one of us is different, so if you're disappointed that you can't get someone to look right because you keep making their face too "fat", you are likely drawing what you "think" you see, rather than what is actually going on.
As an example: This happens to me all the time, when I model for artists or students, because I have a deceptively challenging face to capture accurately (it's not your fault, it's mine, sorry!). I have smaller proportions, and I look quite young, even though I am not, so on first glance people often assume I have delicate features. But if they just draw delicate features, it's not going to turn out. There's also bluntness in my face, square shapes underneath the soft tissue, and width that tends to get ignored because of the initial impression. I've seen a lot of portraits of me, and the universal mistake people make is to forego the underlying structure and jump straight into outlining delicate lips and nose and chin. Or, they try to avoid making me look like a child elf by putting a bunch of lines in, and capturing age goes deeper than drawing "wrinkles", it's about the weight and set of the features on the underlying structure.
When in doubt, think in layers, starting from within.
3. It's good to mix it up and practice from life, or from reference, and also from the imagination.
Here's why we practice, or learn, from the real thing: life teaches us accurately, it has all the answers and it gives us all the secrets, if we observe and study honestly. This foundational knowledge sets us up for success, long term. But if we ONLY do this, we get a bit dependent.
Here's why we practice from imagination: visualization and invention allow us to test our knowledge, our understanding, of the fundamentals, it shows us where we are confused and what we can improve, and it gives us more diversity in our skill. But if we ONLY do this, we develop habitual and contrived figures, and stunted skills.
Balance gives us the best of both worlds!
---
Coming up, a portrait themed reference batch for January, for all tiers!
*Here's an optional self-assignment: pick a favorite character from a movie or show that you enjoy, take a screen capture from a scene on your device of choice, and use that as a reference to do a drawn study of their portrait. Let it be fun, don't get too analytical about it, and see what you end up with. It can show you what you most struggle with, or where you get most confused, and how to focus your learning, moving forward. Then - maybe - do a portrait study of this character you love, but from your imagination! How do YOU see them differently? Explore your process and see how you go about putting that on the paper. Maybe you will see you need to work on initial gesture and structure building before going for a contour, or maybe it will show you you need to study how eye sockets work more. Or, maybe it will help you figure out if you need to practice rendering the effect of light on objects.
That's all from me for now, I've waffled long enough. I hope it was helpful.
Any questions or discussion related to the topic on hand always welcome in the comments section below!