For this and all the larger ships that may come, I need a working mast extension. The ship builders of old seemed to have a similar problem that I have and that is that the resources we use have a limited length! So due to page and tree size limits I need a way to recreate the method of making the mast longer by connecting shorter elements.
And one added challenge for the paper model is that I want the connection (at least as an option) to not be glued fixed but detachable. This will help break the whole rig into smaller components for safe and easy storage.
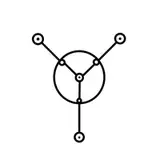
When looking at research photos I see that the "bow" sails (jib and genoa) are usually attached to the lower part of the extended mast as illustrated on the right of the sketch below.

So to be able to thread the main sail onto the main mast and the jib and genoa sail onto the extended mast, I needed to break up the connections of this section as shown in the left of the sketch.
Of course now I needed to find a way to connect the different parts. One of my first ideas was to wrap paper around a toothpick until it has the required thickness and use this as a part as a method to insert and hold by friction.

This worked fine but it was a challenge to find the right thickness of the rolled paper so that it still would fit and have enough friction to stay in place once inserted.

If it was too thin it would result in a very wobbly connection and if you went too far and it would be too thick, you couldn't insert it anymore! A bit of a Russian Roulette solution ...
After some overly complicated attempts with just trying to utilize the bare toothpicks and holding parts inside the mast I went back to the core design of the mast. There I have the outer mast 6-sided hull tube reinforced with a internal 3-sided part.
One thing I started doing when making test builds is to bend the sides of the internal 3-sided part so that the triangle sides became concave shaped. This allowed for better insertion of the inner part as it became a little smaller in diameter and would either expand if too small or contract if still too wide. I also started to make the outer mast hull with two layers to make the part more sturdy.
I then decided to use these inner and outer hull parts as elements you insert into each other. It looks like the obvious solution now but it took the other experiments to get to this conclusion :-)
To get a better grip and improve the friction (and also ease the insertion) I came up with this solution where I glue the pointy end of toothpicks into the outer hull. It works without them but is a big improvement in terms of stability of connection.

Here you see an opened connection. On the outer hull side you see the toothpick ends, which will help slide the inserted part in right. And the inner part shows the concave bent triangle shape. I also cut the inserting end a little narrower again to help the insertion.
This all resulted in this configuration for extending the mast!

Once connected it looks quite seamless. The only caveat is you really have to let the parts dry thoroughly. If not the insertion parts might tear off when you take it apart again. This could be optimized by trimming the insertion parts to the optimal amount of friction ... wide enough but not too much. But once I let the glue dry overnight I didn't have any problems.

I will now start texturing the parts and add the main mast to the final build. The same method will apply to the bowsprit (mast extending in front of the boat).
Until next time, have fun and keep building,
Chris
Papierschnitzel
2018-12-05 13:09:24 +0000 UTCantohammer - the lonely wargamer
2018-12-05 11:46:51 +0000 UTC