Hello, hello! I'm excited to release my behind-the-scenes post for the icon I made to promote my raffle! I'll try to make it easy to read. ;w;
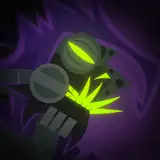
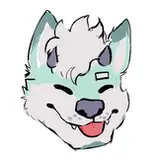
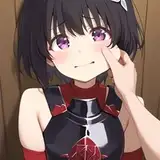
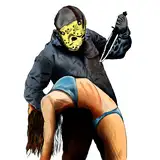
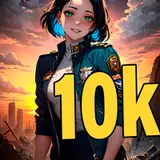
This is my character Boss! I designed them to be quick/easy to draw, but also with a sort of "iconic" villainous type of look? The style I was going for with this was kind of "generic retro anime." For that reason, I gave it a lower framerate than usual, and didn't make any smear frames.
The program I use to draw is Clip Studio Paint. (I know it has a built-in animation feature, buuut I'm stubborn and can't figure it out, so that's why I overcomplicate my process </3)
FIG. 1: I place all my sketches in one folder; I draw out my keyframes first. After that I go and add the in-betweens. I also put all the lineart and colors in folders dedicated to their respective frames, below the sketches.
FIG. 2: These are the keyframes, before adding background and effects!
FIG. 3: These are the in-betweens! I drew a total of ten frames for this icon.
FIG. 4 & 5: Here you can see all my layers after adding the effects, plus how I add effects from CSP! First, I use the Auto Action tool to apply the "Line Effect (Raster layer)" effect to my lineart. Then I copy the frame's folder and duplicate it twice. The one on top, I set to Exclusion on 20% opacity, and move it by about three pixels to the left. On the one below that, I use the "Bloom" effect under my Auto Actions. Combined with doing the same thing to the background, you can see how that makes my completed frames look before I apply the real VHS effect!
FIG. 6: This step is a little new to me, but for this icon I tried assembling the animation in DaVinci Resolve. (I haven't gotten to use it much, so there's still a lot I'm unfamiliar with here...) I imported all of my frames, ordered them in the timeline, and edited how many frames I wanted them to display for. For the icon specifically, I didn't mess with any other settings. I saved and exported, then converted it into the right file type for...
FIG. 7: ntscQT, my beloved! This is the program I use to make my VHS pieces look as authentic as they do. I just popped the video file of the icon into ntscQT and adjusted the settings until I got something I liked. (I always apply "VHS emulating" regardless of the other values I set.) With ntscQT you kinda just have to play around with the settings until you're happy! I always size pictures somewhere around 1000px in here.
And that's pretty much how I made the icon! Once it saves/renders in ntscQT, I'll convert it to a gif, adjust file size/optimize it, etc. as needed. (I think the extra compression from resizing it kinda makes it feel more authentic... right?)
I'll try to answer any other questions left on this post, and I hope I formatted this alright! I also hope I made sense LOL
Thanks for reading, I hope it was interesting!